Wafer Machine - ' ZW ' Semi-Automatic Wafer Baking Machine :-

|
Introduction
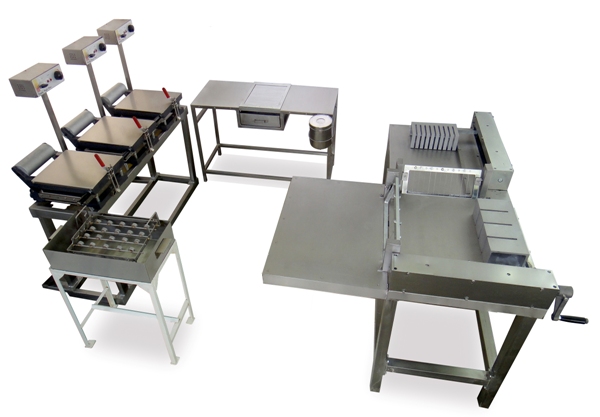
WT Series cream wafer plants are used for the manually operated production of cream wafer biscuits. They are characterized by simple mechanism study and flexibility. These machines are low cost
and economical in operation. Depending on the output required they can be supplied with 6, 9
or 12 Wafer baking tongs. Cream spreading table, cutting
machine, batter and cream mixer and packing machine ensure that production is continuous.
Batter Preparation
A mixer of wheat flour, maize starch, vegetable fat and preservative colours
is churned into a paste in the batter mixer.
Machine
Operation (6 WT)
The batter is fed to a pre-heated wafer tong by a special dosing device.
Baking takes 1-3** minutes. The baked sheets are cooled. Subsequent operations are creaming, sandwiching & cutting. The cut wafers are then ready to be packed. |
Process Chart

Supporting Equipment
| 1. Wafer Tong |
2. Batter Mixer |
3. Cream Mixer |
4. Cream Spreading
App. |
5. Wafer Cutting M/C |
6. Packing Machine |
Technical specifications
Technical / Output Details 'WT'
Wafer Baking Machine - WT2737:
This chart details 6 wafer tong station
| 'WT' Manual wafer plant |
WT1 |
WT6 |
| Output
of wafer sheets / Hr |
30** |
240
** |
| Electric
Heating : |
| Connected load
in KW |
2.5 |
15 |
| Current
Consumption in KW / Hr |
2.0 |
12 |
| Cream filled
wafers / Hour ** (Kgs app.) |
4 |
20
- 25 |
| Dimensions
(approx. in mm): |
| 6
stations are pkd. as 3 station X 2 Cases |
1Tong
X 1 |
3
Station X 2 |
| Length |
750mm |
1420
X 2 |
| Width |
440mm |
440
X 2 |
| Height |
300mm |
750
X 2 |
| Net Weight |
80 |
640 |
| Weight incl.
seaworthy packing |
150 |
900 |
| Shipping space
in M3 |
1.0 |
2.0 |
Working
Instructions
Instructions
1.0 Initial Set Up and Unpacking
1.1 The baking plates are coated with a "gel" for
shipment. Kindly clean it with a clean dry cloth before heating.
1.2 While using the machine for the first time allow the plate to
heat slowly. See notes below.
Note: With new baking plates and whenever the plates have been
cleaned they must be greased well with bees wax or hard fat before
regular baking. Then bake for the first time at reduced heat
and reduced batter quantity. Increase the batter quantity and heat
till you can have proper wafer sheets which release easily without
breaking or sticking to the plates. Remove the wafer sheets with a
wooden spatula or with a brass wire brush. If baking is done
properly a glaze will form on the surface of the tongs which ensures
the easy release of the wafer sheets
2.0 Electrical Connection
2.1 240 volts, single phase, 50Hz,1,5KW/element. Total 2.5 KW.
2.2 There are two heating elements in each baking tongs.
2.3 Earthing is absolutely essential for safe working.
3.0 Baking Procedure
3.1. It takes about 20 minutes for the plates to heat initially.
Note: Batter composition, thickness of wafer and baking temperature
determines the baking time.
3.2 When the desired temperature is reached set the thermotrol
setting of the control box to 70 to 80.
3.3 Thermotrol regulates the time for which the power is to be
supplied to the heating element.
3.4 Dip the dosimeter cups in the batter tank and put it on the
bracket provided for in the tank.
3.5 The excess batter drains off leaving the desired quantity.
3.6 The quality can be adjusted by means of a screw provided near
the lever. The handle raises or lowers the sliding lever which in
turn reduces or maintains the quantity the remains in the cups.
3.7 Test if the correct baking temperature is reaches with a trial a
small quantity of batter is poured an to the plates.
4.0 Advice on Maintenance & Precautions
4.1 Burnt sugar and fat particles leave a brown crust on the
surface of the baking plate when the machine has been in use for a
long time. These burnt remnants have to be removed with a normal brass wire brush.
In case it is not done regularly, the carbon build up will
retard the baking period.
4.2 Never use a wet cloth for cleaning the plates.
4.3 Operational Precaution
4.3.1.Never leave the machine in an "On" position unattended.
4.3.2.Always brief the operator on the standard procedures
4.3.3.Use the side handle only to lower and raise the UPPER tong.
4.3.4.In case after the batter is deposited on the plate the lock
does not operate to close it in the first instance DO NOT try to use
force to close the tong.
4.3.5.In case any spare part is used in the machine, please ask for
additional spare to ensure continuity in operation.
5.0 Batter Recipe
5.1 It is up to the user of the machine to find out the most favorable batter recipe, since customer's taste with regards
to colour, taste and hardness of wafers, differ
from place to place.
5.2 See Annexure for a sample Wafer Batter recipe.
Adjustment For Wafer Sheets
Check the thickness of the wafer sheets for even thickness.
In order to check the thickness of the wafer sheet collect the produce of each wafer tongs separately then measure the sheets
one by one with a thickness gauge/or an accurate verities on all
four corners and in the middle and make a note of actual
differences.
Method A
The thickness of the wafer sheet can be adjusted by means of the
fastening bolts of the baking plates.
-
First loosen all
bolts (M10) [not the four threaded bushings (M20).]
-
Turn the treaded
bushings on the corner that needs to be adjusted either clockwise
(=thinner) or counter clockwise (=thicker). 1/6th of a turn
equals to 0.2 mm and a full turn equals to 1.25mm.
-
After adjustment
tighten the bolts (M10) on all four corners again. Then
tighten the remaining threaded bushings carefully until they
touch the plates and lock with the bolts.
-
Any such
adjustment has to be done with utmost care otherwise the
baking plates may get bent and warped.
-
After adjustment
another trial round of wafer sheets has to be produced and
measured again.
Method B
-
Place four metal
strips or shims of the desired thickness of wafer (minus the
engraving thickness) on the baking plates
Then all set bolts
of the upper plate as well as the adjusting bushings are
loosened so that they no longer rust on the upper plate.
-
The pressure screw
(M20) is screwed as far down as possible by hand against the
plate.
-
Then screw down
all fastening bolts (M10) of the plates. Tighten by spanner
first the fastening bolts, then the adjusting bushings.
-
Open the plate and
remove the strips/shims.
*Note : If it becomes
evident in production that the wafer thickness has a slight
deviation each wafer sheet must be measured. Any deviation can be
readjusted.
Note : It may be necessary to adjust the locking handle pressure
after any such adjustments

WT 1 Special
|

WT 1 Standard |
|